If you have any reason to want to connect to your Raspbery Pi when you're away from home, you're going to want a dynamic DNS address. A dynamic DNS address lets you use a constant address like raspberry.johnsmith.com instead of an ever-changing IP address. This is useful if you've set up a VPN server on your Raspberry Pi or just like to tinker over SSH while you're away.
- Part 1: Raspberry Pi Print Server
- Part 2: Passwordless SSH on Raspberry Pi
- Part 3: Dynamic DNS with a Raspberry Pi
- Part 4: Home Automation with Siri and a Raspberry Pi
- Part 5: VPN with Raspberry Pi
This tutorial has instructions for how to set up dynamic DNS with either Google Domains or Cloudflare. The instructions for Google Domains come first. Scroll down to the bottom to see the ddclient configuration to use with Cloudflare.
This tutorial lets you use a subdomain of one of your domains to point to your Raspberry Pi. After forwarding the correct ports from your router you your Raspberry Pi, you'd then be able to access your Raspberry Pi from anywhere in the world.
ddclient configuration for Google Domains
The first step is to go to the DNS records for the domain you want to use for your dynamic DNS address. There, scroll down to the Synthetic records section and add a Dynamic DNS entry. For me, my dynamic DNS entry is "raspi.kurttomlinson.com".

Next, expand the Dynamic DNS section of that web page and click "View credentials". This will show you a randomly generated username and password that you'll need later.

Next, ssh into your raspberry pi and install ddclient: sudo apt-get install ddclient. Once it's installed, a few prompts will pop up. It doesn't really matter what you enter into the prompts. The prompts are used to created a configuration file for you, but we're going to replace that configuration file anyway.
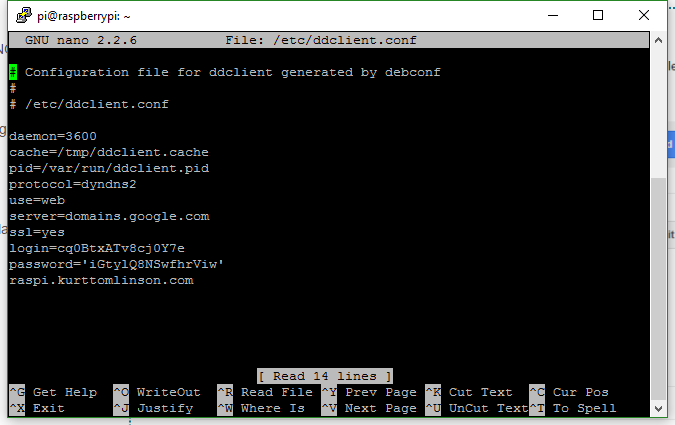
To edit ddclient's configuration file, enter sudo nano /etc/ddclient.conf. Make the configuration file look like the image, but replace the username and password with the username and password you got from Google Domains earlier. Replace the last line with the dynamic domain you created earlier on Google Domains. Here's the content of the config file for your convenience:
# /etc/ddclient.conf

daemon=3600
cache=/tmp/ddclient.cache
pid=/var/run/ddclient.pid
protocol=dyndns2
use=web
server=domains.google.com
ssl=yes
login=cq0BtxATv8cj0Y7e
password='iGtylQ8NSwfhrViw'
raspi.kurttomlinson.com
Finally, make sure that ddclient gets run at boot. You can add ddclient to your rc.local file to do this.
ddclient configuration for Cloudflare
You'll want to use the fork of ddclient that's on GitHub if you're using Cloudflare's nameservers. Here's how to install it:
cd ~
sudo apt-get install libio-socket-ssl-perl
sudo cpan install JSON::Any
sudo cpan install Data::Validate::IP
sudo cpan install IO::Socket::SSL
wget https://raw.githubusercontent.com/ddclient/ddclient/master/ddclient
sudo cp ddclient /usr/sbin/
sudo chmod +x /usr/sbin/ddclient
sudo mkdir /etc/ddclient
sudo mkdir /var/cache/ddclient
Once it's installed, run sudo nano /etc/ddclient/ddclient.conf to modify your config file. See the example config file below:
# /etc/ddclient.conf

daemon=3600
cache=/tmp/ddclient.cache
pid=/var/run/ddclient.pid
protocol=cloudflare
use=web
server=api.cloudflare.com/client/v4
ssl=yes
[email protected]
password=rdyfvi7w2nwtaeh66s64a5auj7vw8yj89cj3m
zone=kurttomlinson.com
raspi.kurttomlinson.com
For the password, use your Global API key. It can be found in the profile section of your Cloudflare account. The 'zone' is the domain/site you have registered on Cloudflare. Note: that's not really my API key, so don't bother trying to use it.
You also need to create an A record with the subdomain you want to update with ddclient. ddclient only updates your DNS entries. It will not create a new entry for you.
To test if ddclient is configured, you can use the command below to debug it:
ddclient -daemon=0 -debug -verbose -noquiet
To run ddclient once an hour, add the line below to your crontab.
0 * * * * /usr/sbin/ddclient -daemon=0 -debug -verbose -noquiet >> /home/pi/ddclient.log 2>&1
Photo by The Preiser Project