A lot of Raspberry Pi projects I've seen on the internet are pretty complicated and require the use of a lot of extra components. The projects that get the most attention are usually esoteric or hard to reproduce. I was able to find a couple useful projects that pretty much anyone can do without purchasing any extra components. This is the second blog post in the series, and it covers how to use a enable SSH without a password on your Raspberry Pi.
- Part 1: Raspberry Pi Print Server
- Part 2: Passwordless SSH on Raspberry Pi
- Part 3: Dynamic DNS with a Raspberry Pi
- Part 4: Home Automation with Siri and a Raspberry Pi
- Part 5: VPN with Raspberry Pi
Typing in your username and password every time you log into your raspberry pi can be a pain. By creating a public/private RSA key pair, you can log into your Raspberry Pi without typing a thing.
First, using [PuTTYgen], "Generate" a key pair, "save private key" somewhere safe where you can easily access it, and copy the "public key for pasting into OpenSSH authorized_keys file."

Then log into your Raspberry Pi via SSH. Open up the authorized_keys file by entering the command nano /home/pi/.ssh/authorized_keys. Right click to paste your public key into the file. Press Ctrl-O, enter, Ctrl-X to save the file and exit Nano.

In PuTTY, you can add your private key to your saved Raspberry Pi profile by adding the private key. (Ignore the ₩ symbols in the file's path. My PC's region is set to Korea to support certain non-Unicode-aware Korean programs. This causes issues with how the backslash character is displayed in some programs because of some reasons that I'd rather not explain right now.)
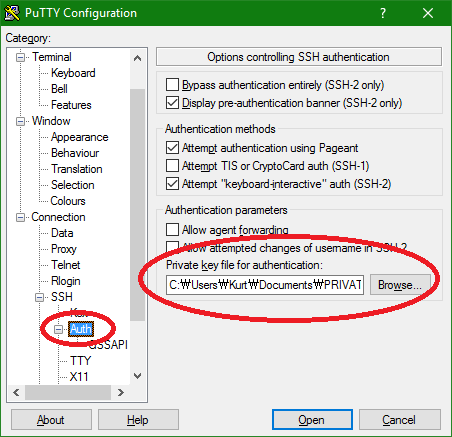
Photo by Jacob Bøtter